DIY FAUX TERRAZZO COUNTERTOPS


For the next three years or so, we're going to be closing the door on this bathroom (it has some layout issues and a very dated jacuzzi) so we thought - why not do something with high contrast blacks and colors Really fun, and isn't grey granite our style?
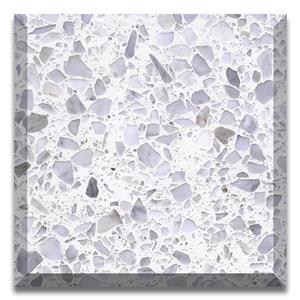
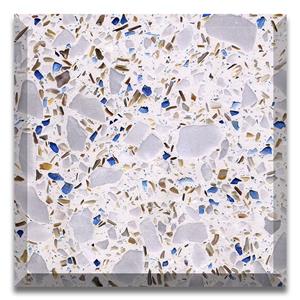
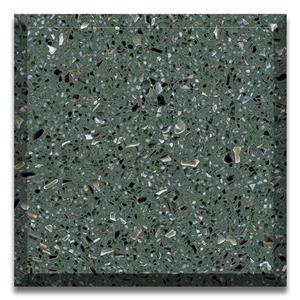
In our former home about five years ago, we purchased some custom colored vinyl chips (usually for garages and commercial floors) and used them on concrete floors in the garage section of our home remodel with epoxy on top . I'm absolutely in love with the modern terrazzo that's been showing up in designs over the past few years, I thought, if I order a bit bigger chip and try this on a countertop, maybe I can replicate the terrazzo finish a bit? We are very satisfied with the result.


Before I start walking you through the process, here are some disclaimers:
It's messy because the chips are all over the place (you basically just throw them away lol) and you make sure to wear protective gear when pouring and using the epoxy, we watched the video for about two hours from Stone Coat Countertops, we bought the epoxy company from here, before we did anything to learn the proper technique for mixing, pouring and working with this material. We also previously ordered some samples of granite (very similar to the original countertops) for trial runs, so highly recommend if you can!
Having said all that, we feel that this project is 100% worth it.
Supplies:
– Degreaser for cleaning surfaces
- High adhesion primer
- Your desired base color latex paint
- small paint roller
- Details of small brushes
- Colored vinyl sheets (you can get a custom color chart from this company. I like to use their blending tool to see the look - they use Sherwin Williams colors so if you need to go to the SW store and get some paint swatches you can do this).
- Dry brush to remove loose debris
-Epoxy (Highly recommend the Stone Coat countertop - it's designed for this type of project, there's a square foot calculator on this page so you can see how much epoxy you'll need)
- Disposable mixing buckets (helps to buy buckets marked with ounces from the hardware store so we can be very accurate)
- a method of mixing epoxy, such as the drill's mixing attachment - just make sure the attachment is compatible with your specific drill
– Trowel to apply epoxy resin
- Short brush to "cut" the epoxy
- Blowtorch (make sure it can be inverted; otherwise low propane will burn)
-tweezers


First, let's talk about project preparation. We thoroughly cleaned our surfaces with a degreaser. Next, we put tape anywhere we don't want the paint and epoxy to disappear. If you're doing a countertop, that means any sinks and areas around the countertop/backsplash, definitely don't forget the faucet holes! We glued the plastic directly underneath and put the plastic on the bottom of the cabinet just in case. (Quick side note: we recently successfully painted this vanity using this hard dry paint tutorial.) Next, we primed all of our surfaces with a high adhesion adhesive primer. We applied two coats of this primer for best coverage.

After your primer has dried for about four hours, you can start painting your base color, which is what will show through underneath your chips. We needed a solid two coats of white base paint (it’s just regular latex paint from the home improvement store). Keep in mind you will be doing another layer of paint after this one to spread the chips over your surface, but I highly recommend making sure the entire surface has really good coverage. The last thing you want to be worried about while you’re sprinkling/spreading your chips is covering up sparsely painted areas.

Our first step with the chip is to handle all vertical surfaces. To do this we tape the edges of the flat so the paint/chips don't stick where we don't want them sticking (they will build up and you'll end up with more chips than you want) Place). We then painted the base into small sections about 4×9 inches. Working quickly with the paint wet, we "throw" the chips horizontally into the painted area. It's certainly challenging, but not impossible! During our first retest, we realized our technique wasn't working, so we scraped off the chip with a putty knife and started all over again. Not the end of the world, but you want to lower your throwing skills before going all-in.
You can see in the photo above that the vertical sink looks messy, so here's how we cleaned it up: Once the paint was dry, we dabbed the debris with a gloved hand to help it adhere to the paint. You want to make sure you don't leave paint on your chips, so if the paint is completely wet, wait! After we put some pressure on the chips, we swipe our hands over the finished position to break up any loose chips. It's important to remove as much loose debris from your surface as possible so they don't float in the epoxy later.
After this step, you may notice that some bald heads require more chips to create an even look. To fix this, you can do on-site processing. Just take a very small paintbrush, dip it into your base color, and splotch the areas that need attention. Repeat the pressing and sliding process again to remove any loose chips. You may need to repeat this process several times, but your patience will be rewarded if you want to distribute your chips evenly.
Once you've finished the entire backsplash, sink, and front vertical surfaces, you can use a dry, clean paintbrush to remove any loose debris. We just brushed them into the sink because it had tape and obstructions.

Next, we remove the tape from the flat surface so we can add the chips - this part is much easier than the vertical part! Make sure to still only paint small sections because you want your paint to be as wet as possible so the chips are not tossing, we sandwich the chips between our fingers and move them back and forth, kind of like you're feeding fish fillets (this is what I can Best example that comes to mind, haha). Repeat the field treatment on a flat surface if needed! Let your chips and paint dry for at least 12 hours.
We mix the epoxy by adding the hardener to the resin and mixing for two minutes (maybe more or less depending on what you're using). Look at the specific product you are using to see how much product you need to mix for your surface area. The formula we use has no odor, but we wear masks, gloves and glasses just in case.

We then inspect the entire plane with the flame of a blowtorch to remove air bubbles. Don't burn your vertical surfaces as epoxy doesn't settle on these surfaces the same way. I highly recommend getting a blowtorch that can be inverted or a few cans of propane as the torch will burn if the propane is too low.
To start the final steps, we removed everything that had tape, like the sink bowl and around the backsplash.
To wrap up the project, we checked the entire area a few times with a blowtorch just to get as much air out as possible. We waited three days to use the counter top lightly and it was completely cured in 30 days. We're so excited about this new look - delighted every time I walk into the bathroom!


Thanks for following along, and best of luck if you decide to take on this project!